Fallen Angel: Learn How to Practice This Beautiful Arm Balance (Photo Tutorial)

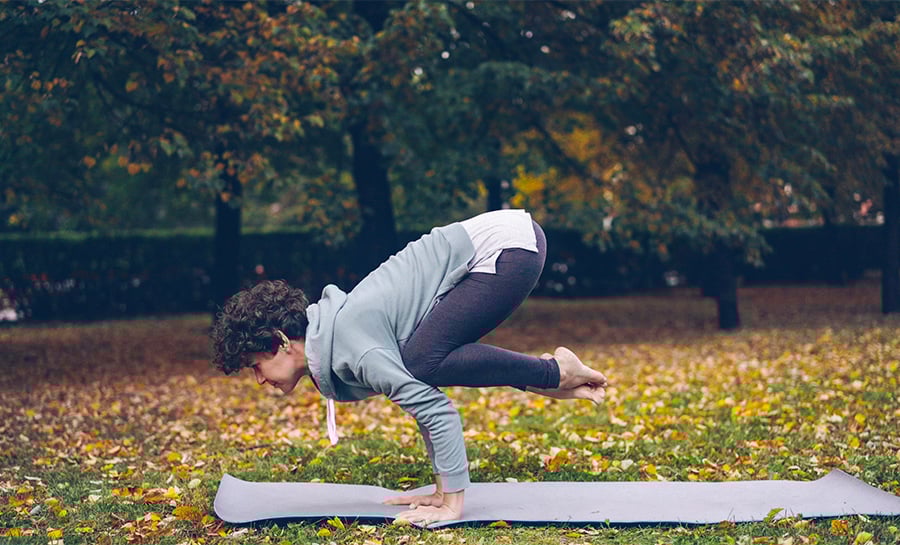
Fallen Angel is a Side Crow (Parsva Bakasana) variation that looks much more intimidating than it is in practice. It’s a beautiful and graceful pose that you can sneak into any sequence or yoga class that includes a Side Crow.
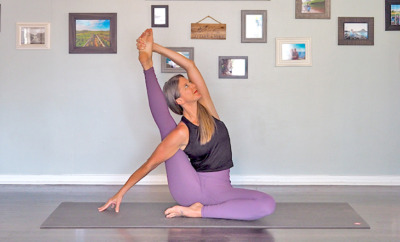
Want to learn or refresh your Side Crow Pose? Here’s How to Practice Side Crow (Step-By-Step Photo Tutorial)
Many yogis are apprehensive to try Fallen Angel.
Why? Because it looks like it puts a lot of strain on the neck. But the head is just resting delicately on the ground, and most of your weight is actually in your shoulders and hands.
You should have a solid Side Crow practice before attempting this fun yoga pose variation.
It is important to note that although this pose is named Fallen Angel, there is no falling involved. All movements are executed with control and intention.
Prepare Your Body to Practice Fallen Angel With These Warm-Up Poses:
Before trying Fallen Angel, make sure that your body is adequately warmed up with a variety of poses and twists.
Start off with some breath work, supine twists, and wrist stretches.
Move onto 3-5 rounds of Sun Salutations A and B (Surya Namaskar), Revolved Chair Pose (Parivrtta Utkatasana), Half Lord of the Fishes (Ardha Matsyendrasana), Revolved Triangle (Parivrtta Trikonasana), and core work such as Plank Pose (Phalakasana).
Ready to try?
Here’s How to Practice Fallen Angel: Follow Along Step-By-Step
1. Start in Toe Stand (Prapadasana)

- From Mountain Pose (Tadasana) bring your hands to heart center, or to your hips
- Slowly bend your knees, lowering your hips down until your thighs are parallel to the ground
- Lift your heels up off the mat as you lower your hips
- Roll your shoulders back and keep your chest lifted and your gaze forward to help you balance
- Draw up through your pelvic floor and keep your back long and straight to find stability in the pose
- Squeeze your legs and feet tightly together and activate your Mula Bandha, or pelvic floor
- Press firmly into your toes to find a bit of lift and hover your bum just above your ankles
- Gaze (Drishti) straight ahead
Learn More About How to Activate Your Bandhas to Deepen Your Yoga Practice
2. Add a Twist

- Keep your core engaged to help with balance as you add a twist
- Inhale and lengthen your spine, exhale and twist to the left
- Press the back of your right arm into your left thigh
- Try to keep your hips and knees level to focus the twist in your spine
- Take a few breaths here deepening your twist with each exhale
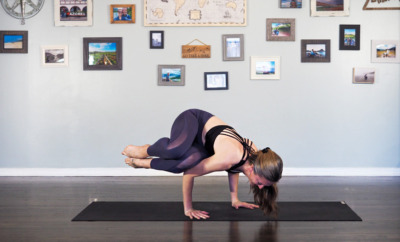
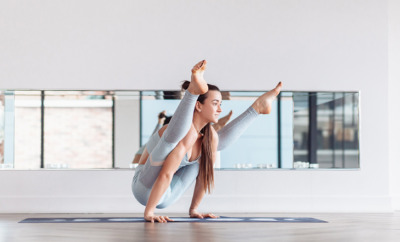
3. Move Into Side Crow (Parsva Bakasana)
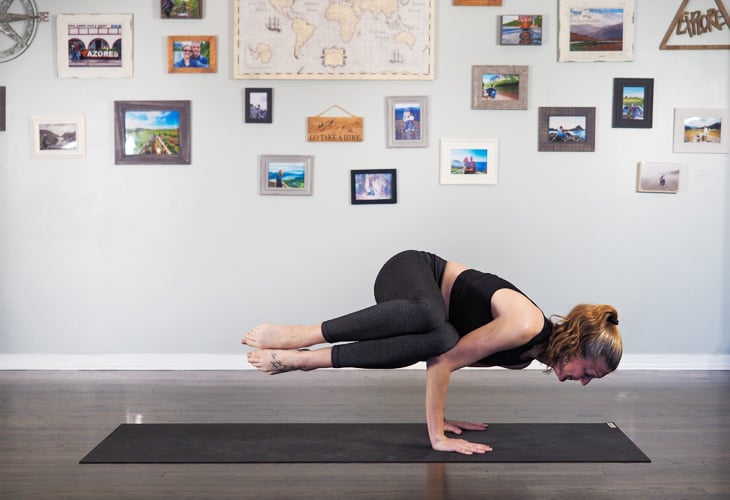
- Plant your hands on the mat, fingertips in line, shoulder-width apart
- Spread your fingers wide and grip the mat with your fingertips
- Move your drishti to the mat just in front of your fingertips
- Lift your hips and shift your weight forward
- Keep contact between your right arm and left thigh
- You can rest your left hip on your left arm to help find your balance
- Float your feet off the floor
- Continue lifting your feet until your shins are parallel to the floor
- Flex or floint (half flex/half point) your feet once they leave the ground
- Press firmly into the mat and lift through your core to help keep your shoulders in line with the elbows
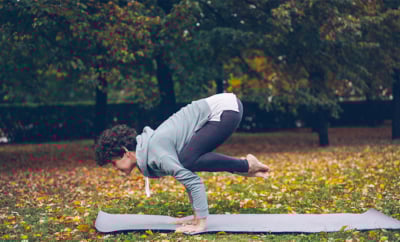
4. Lower and Lift
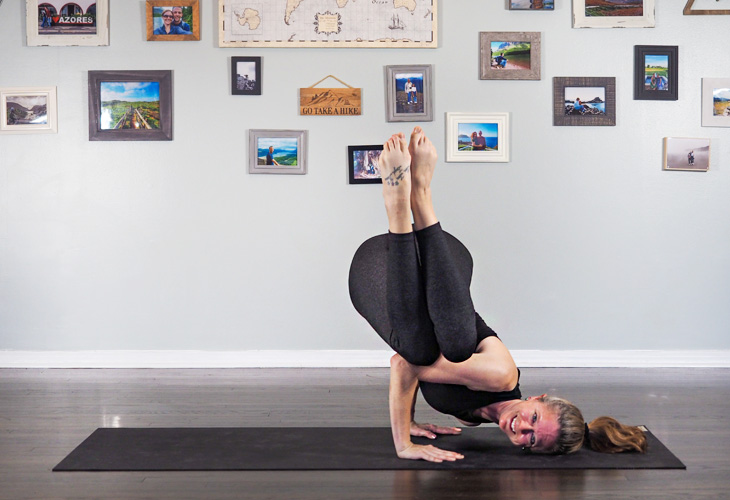
- Slowly and carefully lower your head down to the ground placing your left temple on the mat
- Your head is only resting on the mat for balance, do not transfer weight onto your head or neck
- Gaze ahead at a fixed point
- Point your toes and bring your feet up towards the ceiling
- As your lift your feet up, your hips will also lift high into the air
- Take a few breaths here continuing to lift your feet up until your shins are almost perpendicular to the floor
- Remember to keep your core engaged during this step to help keep your balance and your hips lifted
- Press your hands firmly into the mat and actively draw your elbows towards each other, almost like you are trying to push the ground away from you
- Keep your weight in your arms and off your head
5. Straighten Your Right Leg

- Carefully extend your right leg straight up towards the ceiling
- Keep your left leg bent with your knee resting on the back of your right arm
- Maintain your gaze at a fixed point in front of you
- If you start to wobble, remember to draw your belly button towards your spine to engage your core and push firmly into the mat with your hands
- To help with alignment, you can try briefly touching your left foot to your right quad to make sure both legs are pointing up and in line with each other
To come out of the pose, bend your right leg, bringing it back down towards your right arm, pivot back into Side Crow, and then lower your feet to the floor returning to our entry pose, Toe Stand.
Take a few breaths to rest in Child’s Pose before trying side 2.
Fallen Angel: A Few Final Tips for Your Practice
Proprioception is hard in this arm balance yoga pose since your head is on the ground unable to move, and your body is floating above it. Grab a friend to help guide you the first couple of times or record yourself to see if your legs and feet are pointing up or if they need adjusting.
It may take a while to find grace and alignment in your Fallen Angel Pose. Remember that, as with all of our asanas, you are looking for a balance between effort and ease. You many need to find a bit more ease as you float into this pose rather than forcing yourself by muscling it out.
Keep in mind that even angels fall, so don’t be too hard on yourself when you tumble or if you don’t find perfect alignment your first few attempts. This arm balance takes practice, but enjoy the journey of finding your Fallen Angel.
Check Out the Take Flight Arm Balance Yoga Program on YA Classes
Can’t get enough arm balances? We have an online yoga program for that!
This article has been read 939 times. Share it and spread the love!
You May Also Enjoy

These 10 yoga poses improve concentration. If you constantly feel distracted or unable to focus, check out the poses and try them here!
Read »

Don't Miss These


This Month's Letter
From the Editor
Monthly motivation and food for
thought from our founder.