Try These 7 Yoga Pose Modifications to Avoid Yoga Injuries (Photo Tutorial)

While yoga has many wonderful benefits for our body and mind, it also has the potential to cause yoga injuries if we aren’t careful. According to beYogi, the most common injuries in yoga happen in the wrists, elbows, shoulders, hips and low back.
But most injuries in yoga can be avoided by listening and responding to your body, entering poses with care, and not pushing yourself beyond your current capacities.
Remember that things can change from day to day, so even if you can do advanced yoga poses, some days you might need to skip them. And that’s ok! In fact, the true measurement of being an ‘advanced yogi’ is how much you’re able to listen to and honor your body while on the mat.
Instead of throwing yourself into a pose you’re not yet ready for, try substituting these poses with other less injurious, but still challenging options.
Here’s How to Prevent Injury When You Practice These 9 Common Yoga Poses
Prevent Injuries In Yoga With These 7 Yoga Pose Modifications:
Avoid getting injuries in yoga and care for your body and mind with these challenging but safe yoga pose modifications.
Yoga props are always an excellent addition to yoga pose modifications! While completely optional, we do recommend using two or three yoga blocks.
1. Standing Forward Fold: Modify With Bent Knees

Forward folds are often used in the beginning of class and as part of Sun Salutations. But folding this intensely before warming up the glutes and hamstrings may cause muscle tears.
Although not a pose substitution, this simple yoga pose modification can make a world of difference and make your hamstrings happy again.
Let’s try it:
- Start in Mountain Pose (Tadasana) pose with your feet together or hip-width apart
- Inhale and reach your arms up overhead, creating a bit of length in your spine
- Exhale and fold forward at your hip joint
- Here’s the simple yoga pose modification: Bend your knees!
- Bend your knees as much as you need to so your hands can reach the ground or yoga blocks
- Gaze toward your shins rather than the ground to take strain off your neck
- As your muscles warm and class progresses, you may find that you need to bend your knees less
- Even after fully warming up, it can be helpful to keep at least a small bend in the knees to protect your hamstrings
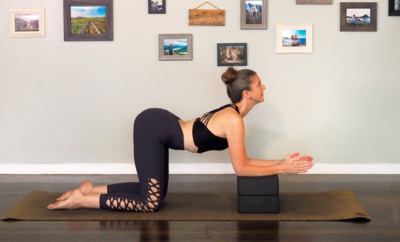
2. Four Limbed Staff Pose (Chaturanga Dandasana): Replace With Kneeling Chaturanga

Chaturanga is a pose where there’s a lot more going on than it looks. You need core and arm strength, shoulder stability, and whole-body engagement to execute this pose safely.
Lifting or dropping your hips, scrunching your shoulders, dipping your head, or splaying your elbows wide are all signs that you might need a different pose.
Replace it with a Kneeling Chaturanga with a block instead and build some strength before trying full Chaturanga again so that you don’t run the risk of getting any yoga injuries.
Let’s try it:
- From Plank Pose (Phalakasana), place your knees on the mat
- Grab a block and place it on the ground at the center of your chest bone on its medium height
- Place your hands under your shoulders with your fingers spread and the creases of your wrist parallel to the front of the mat
- Stabilize your body by engaging your core, firming your legs, and finding length from your knees to the top of your head
- With control, exhale and lower your body toward the ground until your upper arms are parallel to the ground
- Shift forward slightly as you lower down, so your hands are now slightly behind your shoulders
- Snug your elbows in close to your chest
- Keep your head in line with your spine and gaze down at the mat
- Use the block to help support your chest from sagging below your elbows
Use These 5 Tips to Practice Chaturanga Correctly
3. Headstand (Salamba Sirsasana): Replace With One-Legged Dolphin

The main risk with Headstand is the potential for neck injuries. Falling out of Headstand, not properly supporting your head and neck, or lacking arm strength to push away from the ground can all make Headstand precarious.
Some advanced yogis skip this pose altogether due to the risks associated with it. Instead, try this yoga pose modification, which gives you all the benefits of an inversion without the risk of getting yoga injuries.
Let’s try it:
- From a kneeling position, place your forearms on the ground
- Depending on your shoulder flexibility, there are two options for your forearms
- You could plant your forearms on the ground parallel to each other, with the palms of your hands facing down and your fingers spread
- Or you could bring your hands together interlacing all but your pinky fingers – leave your pinkies long for stable contact with the mat
- Whichever option you choose, press your forearms firmly into the ground
- Lengthen your spine as you bring your bum up to the air like in Down Dog (Adho Mukha Svanasana)
- Gaze at the ground between your arms
- Walk your feet in toward your chest to lift your bum higher, trying to stack it over your shoulders
- Land with your feet hip-width apart with a slight internal rotation at your hip joint so the outside of your feet are parallel to the outside of the mat
- Lift your right leg up toward the sky. Flex or point your foot
- Stay for five breaths, lower your right leg, and then lift your left leg
- Enjoy a Child’s Pose (Balasana) for a few breaths after your Dolphin Pose
4. Wheel Pose (Urdhva Dhanurasana): Replace With Bridge Pose (Setu Bandhasana)


Deep expressions of backbends require flexibility in the back and shoulders along with strong legs and core for stability.
Some students try to force themselves into these poses, which can cause tears in the soft tissues around the shoulders, lower back injuries, and discomfort in the knees or hips.
To protect yourself from yoga injuries, try Bridge Pose instead, and add a leg lift if you want an extra element of challenge in this yoga pose modification.
Let’s try it:
- Start laying on your back with your legs bent and your feet on the ground
- Separate your feet hip-width apart, and align them so the outside of your feet are parallel to the outside of your mat
- Bring your arms down by your sides
- Use the strength of your front body to lift your hips up off the ground
- Keep your knees, hips, and feet in alignment
- Roll your shoulders under and clasp your hands together under your hips
- Leave your head and neck stable on the ground, and avoid dumping weight into your neck
- To add an extra challenge, walk your right foot in toward the centerline of your body
- Press firmly into your right foot and lift your left leg up in the air
- Flex or point your left foot
- Lift your glutes like you are trying to stamp the ceiling with your foot
- Hold for five breaths, bring your left foot down, and repeat on the other side
- Take a few breaths after and allow your knees to fall from side to side to release any tension in your lower back before moving on
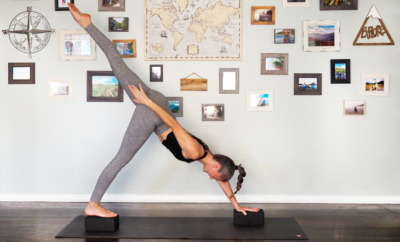
5. Splits (Hanumanasana): Modify With Blocks

For some yogis, Splits seems to be the ultimate show of flexibility.
While the pose does stretch the thighs, hamstrings, and groin like nothing else, there’s no point in overstretching these to the point of injury just to touch the ground.
For safe Splits, you want to keep your hips neutral and your muscles engaged. Grab three or more blocks and try this variation.
Let’s try it:
- Start in Half Splits, using a block under each hand
- Slide your front foot forward and your back foot back, moving toward full Splits
- Once you reach a place where you feel a stretch but not strain, place a third block under your front thigh. Stack multiple blocks here if needed
- Curl your back toes under to help create neutral and level hips
- Press your hands into the blocks to lengthen your spine and lift your chest
- Hold for up to eight breaths, then press into the blocks to lift your hips and return to Half Splits before trying the other side
Ready for full Splits? Practice These 9 Yoga Poses to Help You Get Into Full Splits
6. Lotus Pose: Replace With Double Pigeon / Fire Log Pose

To get comfortable in Lotus Pose, you need open hips, strong knees, and flexible ankles. Based on the bone structure of your hip joint, this pose may not be possible for you.
Even if it is, you may not find it sustainable. So the perfect yoga pose modification for this is Double Pigeon, which offers a safer alternative.
Let’s try it:
- Start in Easy Seat (Sukhasana)
- Uncross your left leg and allow your right knee to rest on the ground or a block
- Bring your left ankle to rest on top of your right knee
- Stack your left shin on top of your right, and flex both feet
- Externally rotate your left leg at your hip socket to bring your left knee down toward the right
- You can slide a block between your left knee and right foot to support your knee if you have tighter hips
- Add a blanket under your hips to give you a bit of lift if you desire
- Lengthen your spine, and gaze down toward the ground
- Rest your hands by your sides, or take a mudra
9 Powerful Mudras to Add to Your Yoga and Meditation Practice
7. Shoulderstand / Plow Pose: Replace With Legs Up the Wall

Shoulderstand and Plow Pose are contentious poses that are prone to create neck and shoulder yoga injuries, along with headaches – even when done correctly.
These poses are sometimes offered at the end of class, and often aren’t accompanied with much instruction or props for support. Skip the mess and try Waterfall Pose instead.
This pose is frequently done at the wall as a restorative option, but it’s much more active done without the support of the wall
Let’s try it:
- Start laying on your back with your legs bent and your feet on the floor
- Lift your hips up off the floor just enough to slide one or two stacked blocks underneath your hips
- Rest your hips down on the blocks
- Bring your hands to rest on the ground anywhere that’s comfortable
- Extend your legs overhead, keeping a slight bend in your knees to prevent hyperextending
- Extend through your legs, and press through the balls of your feet
- Release tension in your head and neck
- Enjoy for as long as you like!
Use These Yoga Pose Modifications to Avoid Injuries In Yoga
Yoga should be about caring for your body and soul, not about pushing yourself to the point of injury.
Learning new poses and challenging yourself is part of growth. But knowing when to step back and substitute a pose with a gentler option is the true definition of what it means to be an ‘advanced yogi.’ Avoid injuries in yoga and use these yoga pose modifications anytime you want to modify your practice.
Please share how these yoga pose modifications helped you in the comments below! We love hearing from you.
This article has been read 175 times. Share it and spread the love!

Don't Miss These


This Month's Letter
From the Editor
Monthly motivation and food for
thought from our founder.